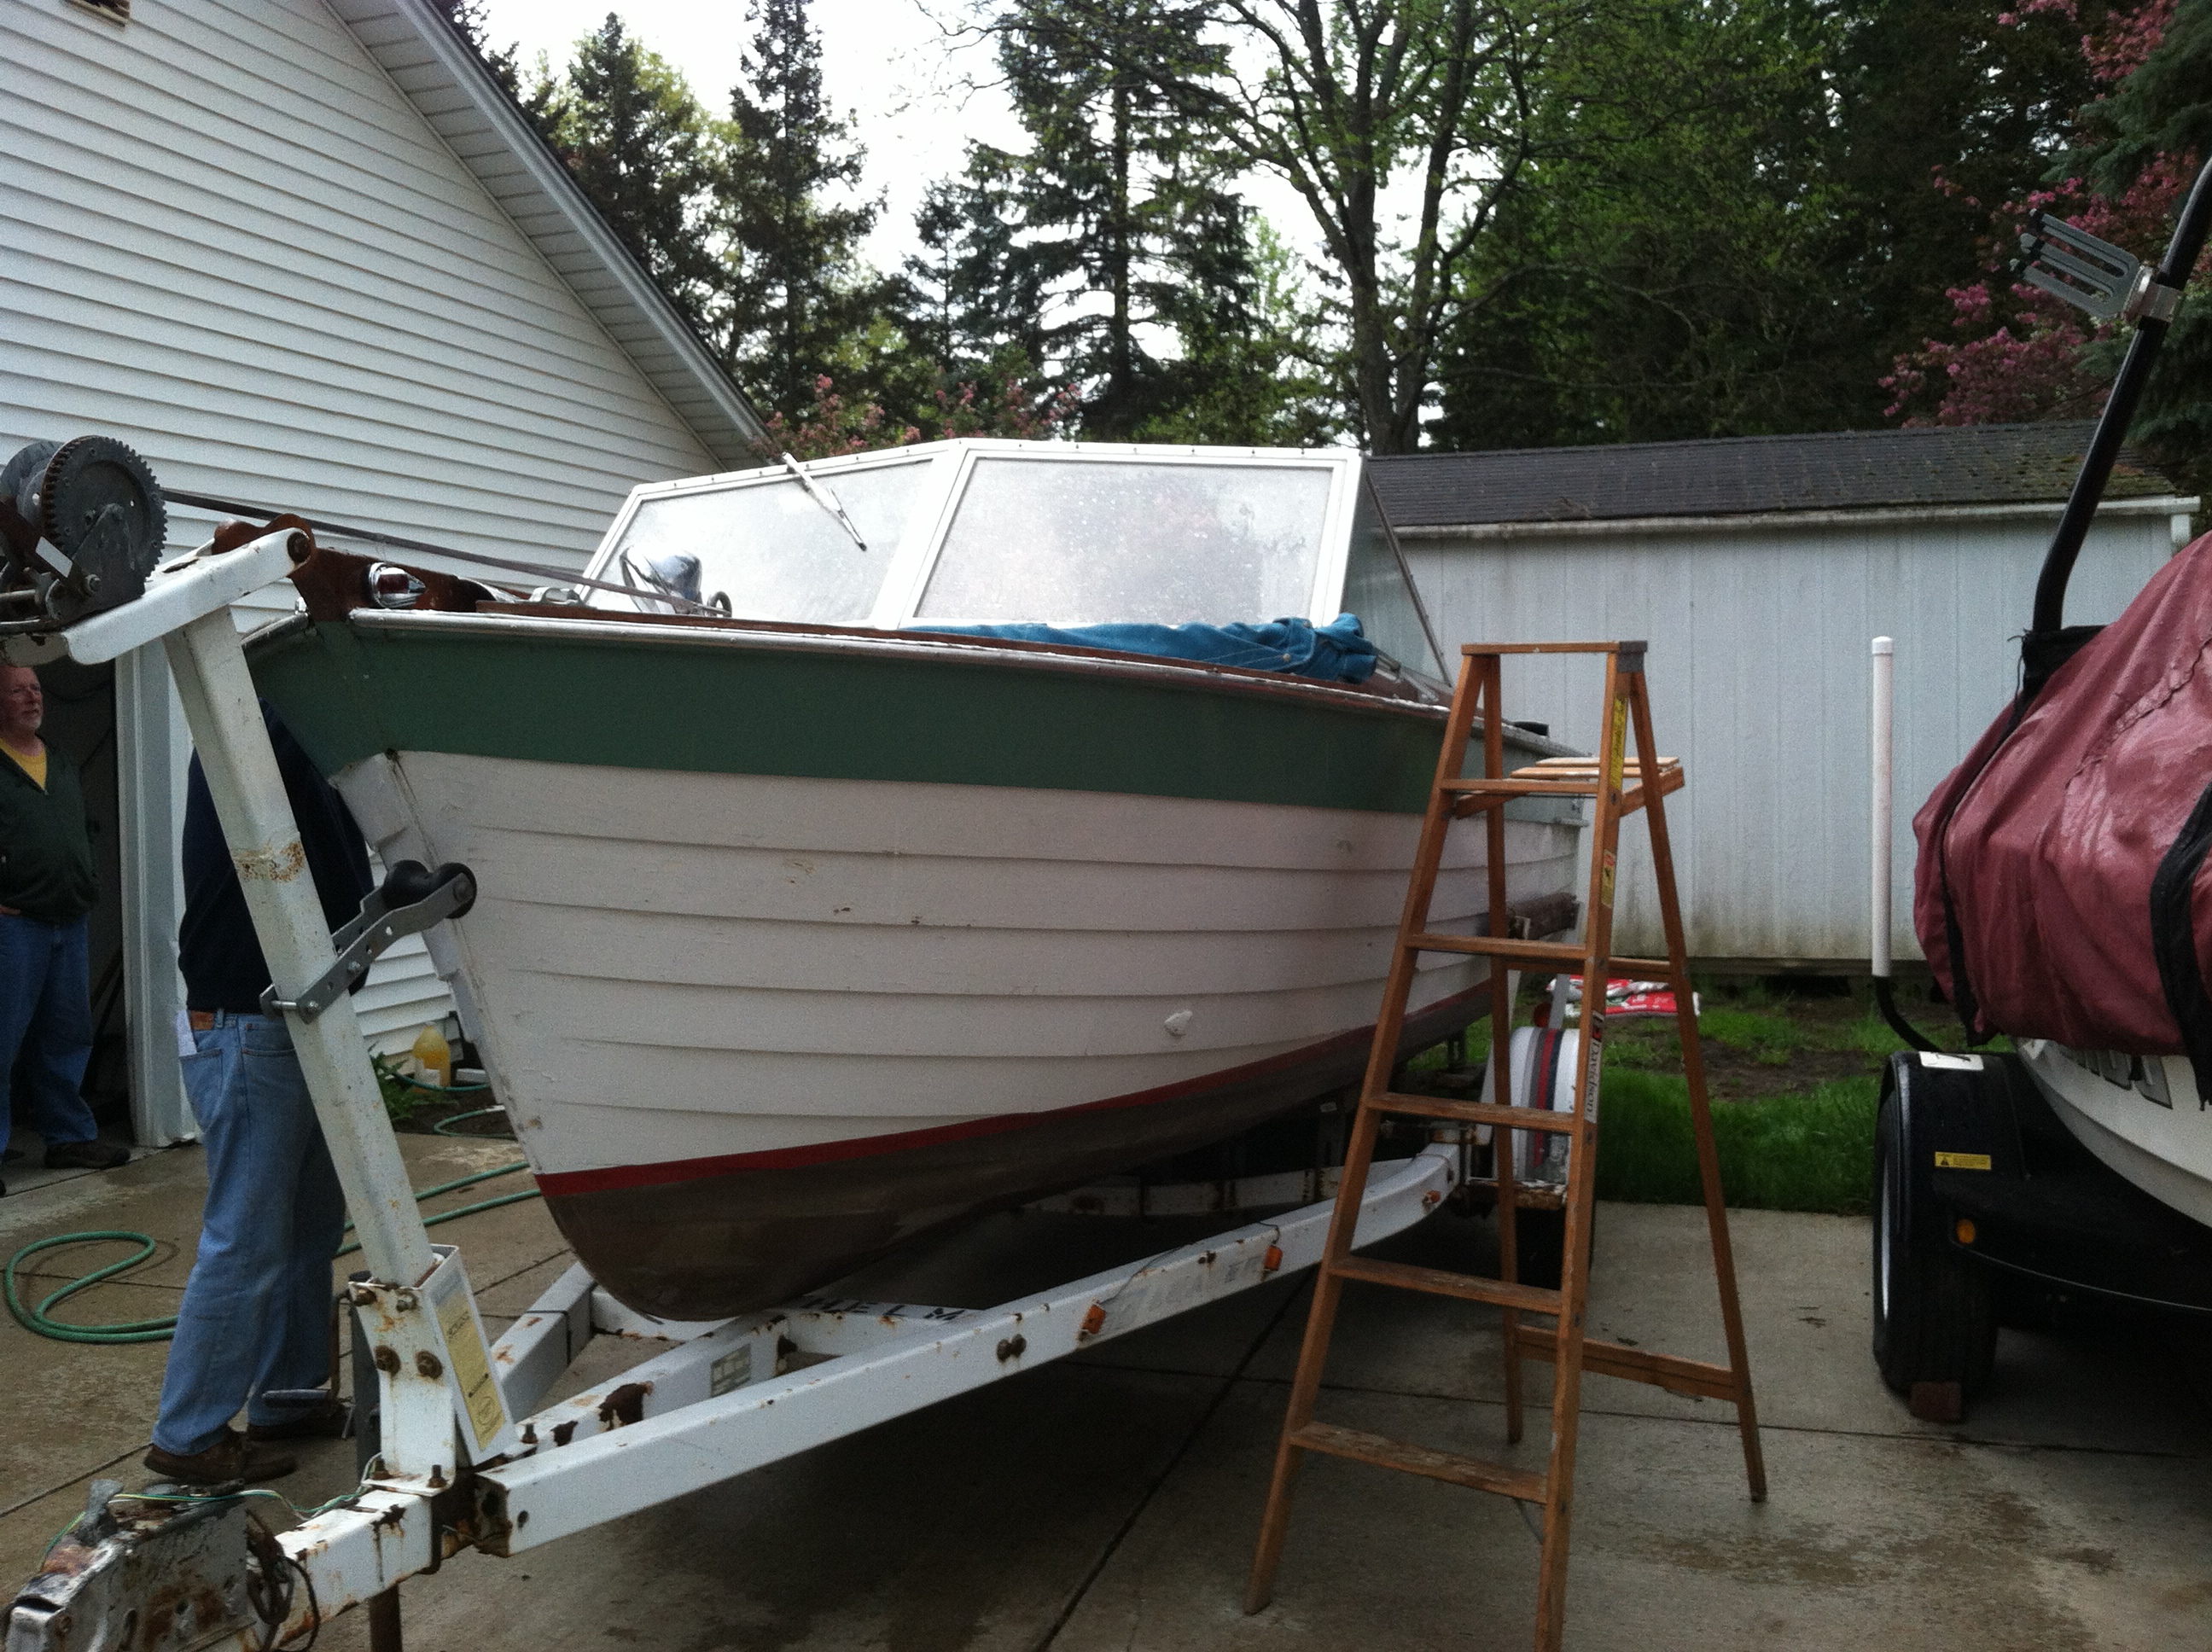
Three and a half weeks after getting the boat I am finally getting around to writing an update. This is going to be a rather long post.
First off, we’re naming her Remember When. Fitting for a classic boat and just happens to be the title of the first song Lindsey and I danced to. A country song by Alan Jackson who coincidentally is a bit of a boat collector himself. Lindsey came up with the name, in about 30 seconds of thought. I tried to come up with one but could not get my mind off of things like fixing broken seat supports and wiring. That makes two names we’ve pulled from country songs we love – our daughter, Carlene, got her name from Phil Vassar‘s song of the same name.
Let’s go in order of what’s happened since getting the boat –
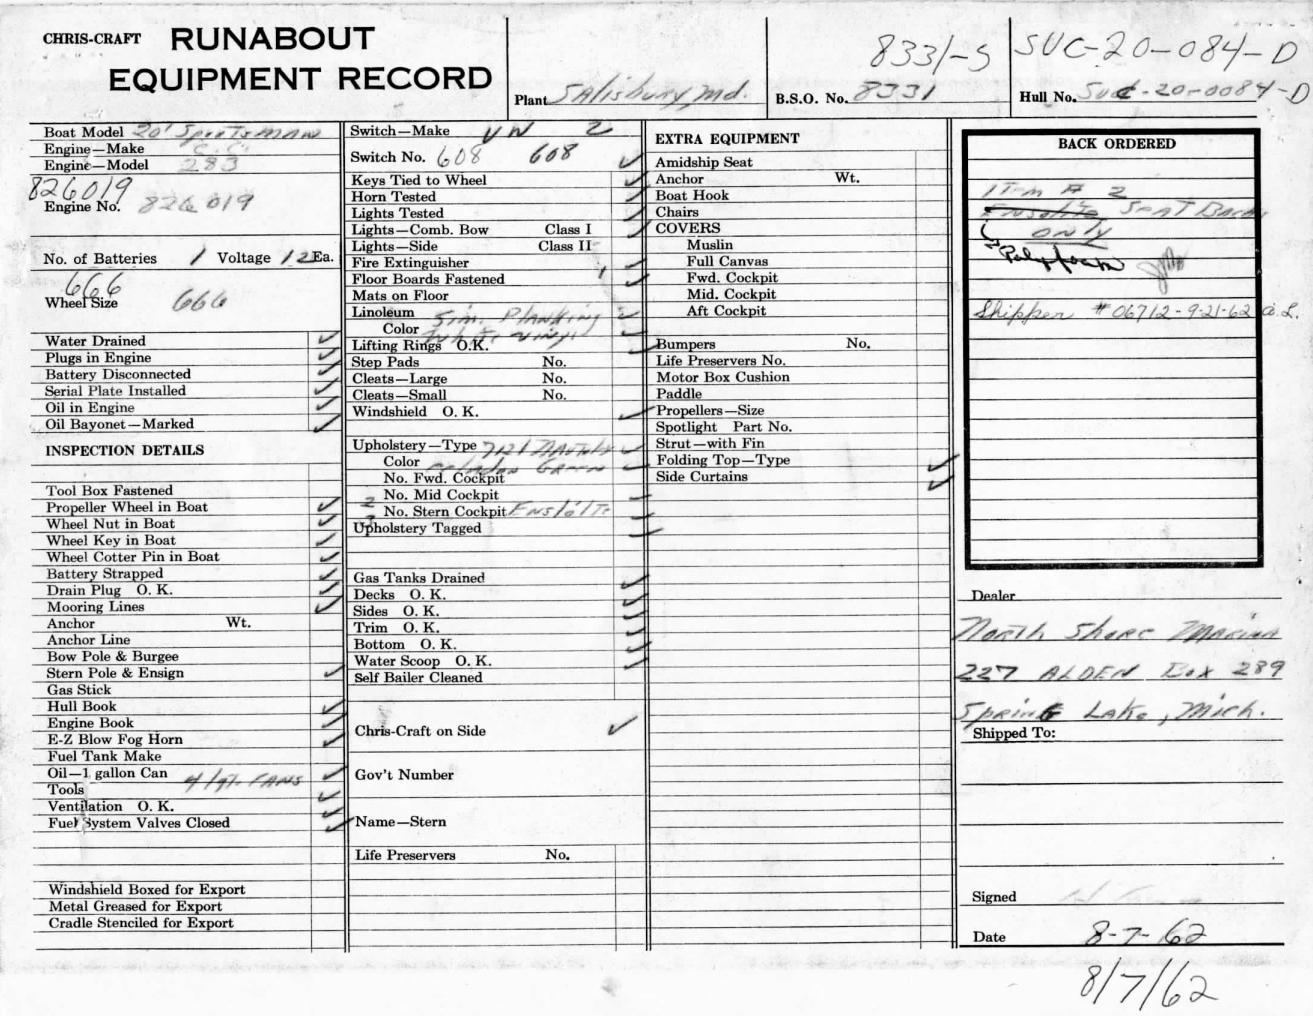
The day after, May 11, I went to the Secretary of State to pay my fines, I mean taxes, and to register the boat and trailer. Michigan has permanent trailer plates, and the fee is based on the empty trailer weight. In a previous post I discussed this. Turns out the state has tables of trailer weights by manufacturer and they will apply a weight to your trailer (on the high end) if you do not know it, or do not want to go through the hassle of weighing it. Good enough for me. All set. I also got the registration number, in Michigan they’re “MC” numbers – why not “MI”? Who knows.
After doing that I got the stickers to put on the hull for MC numbers – knowing that I plan to strip and repaint the hull I decided to just get hardware store grade basic stickers for now. That still didn’t stop me from laying out lines and taking over an hour to put the numbers on straight.
Sunday was Mother’s Day – no boat work on Mother’s Day. It’s a law somewhere.
Monday I started removing the decking so I could clean out the bilge. Complicated by the fact that someone in the past striped out many of the screw heads. Most of the screws on these old boats have what look like phillips heads – but they’re not. They’re frearson and a phillips screwdriver or driver bit will strip them very quickly, especially the soft bronze screws. The worst of it was the trim board holding the deck down at the bottom of the gunwales – I had to drill most of those screws out, I did manage to keep the boards in good shape.
Starboard side decking removed. Note – flame arrestor installed 90 degrees off and my beer can prize on the bench
Thankfully, the only real surprise on the starboard side bilge was a beer can, a very old beer can. All of the frames are solid, just dirty and needing of a few coats of bilge paint.
Before removing the decking I had noticed that turning the wheel would at the same time cause the shifter to move – meaning the linkages were likely binding up somewhere. Removing the decking revealed the problem.
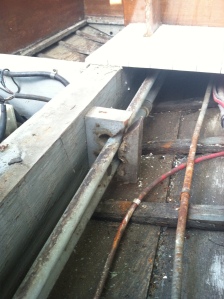
Guide block for steering and shift linkage pipes.
The removable side to the guide block for the linkages was unattached and laying in the bilge (loosely replaced in the photo). The nut and washer were no where to be found — I bought new stainless hardware to replace it. Other items in the photo: the red cable is the throttle cable, the rusty cable is the tachometer drive cable — future items to replace.
Tuesday, Wednesday and Thursday evenings I redid the indicator lighting and mounted the license plate on the trailer. I fished the majority of the wiring through the trailer’s steel tube framing – I think this is the first time I’ve successfully used an electrician’s fish-tape. I’m happy with how it turned out, but it did nothing for hiding the rusty steel (not sure if I’ll keep this trailer long enough to justify completely repainting it). Somewhere in that time I also replaced the spark plugs so I felt like I did something to the boat.
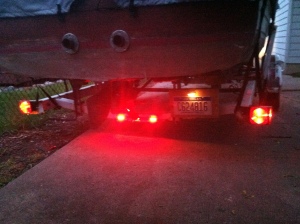
Rear trailer lights and license plate.
Friday, May 17 – I towed the boat out to a trailer repair shop in St Clair Shores to have the brakes worked on. I was hoping to get out of there with little damage – what I got was a new coupler, hydraulic lines, bearings, pads… basically new brakes. Not ideal for the budget but worth it. Towing with properly working brakes is much easier and certainly safer. My 2nd backing the boat up the driveway experience was successful on the first attempt, my trailer reversing skills are returning to my late teens and early 20’s construction work glory days.
Saturday, Glen came over to help out. Much appreciated. We tackled a few things. Before he arrived I got the port side decking out and shop vacuumed out the bilge. The surprise on the port side was a Frisbee – not a new one but what is likely a 30 or 40 year old one. Fixing that surprise takes 2 seconds – I wonder if I can sell it on Ebay?
We also adjusted the steering and transmission linkages – they were binding up on each other, and we put gear oil in the steering gearbox – something that may not have been done since 1962. Last job of the day we took apart and reassembled the shifter bracket at the helm – it was loose and not very sturdy.
The following week I did not really get much done – aside from spending (more) money. Having had the time to inspect the boat and get acquainted with what I have the to-do list has grown, not surprisingly. I could write a mile-long to-do list – but at this stage I need to put the list into “must do” and “like to do” categories. The goal for this season is to get some use out of the boat – whether that’s 3 days on the water or 10. I’m not going to rush-job repairs just to get them done – do it right the first time even if that means spending some extra cash and time. Long-run vision is better in the end (I also invest in index funds..).
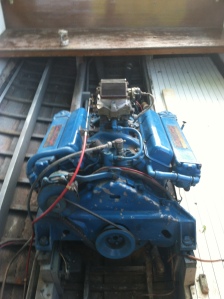
Overall this boat is surprisingly original. The alternator belt has a Chris Craft part number on it. The plug wires are original. The distributor and carb are original. As great as that is – we intend to use the boat, and on Lake Huron. I don’t want a day ruined by a 50 year old part failing. That said, we’re going to be replacing some worn, old parts. Wherever possible and feasible for my wallet they will be replaced with the correct parts, otherwise I’ll replace with what’s available.
Items done or in progress – Group 1
- new battery cables – originals were shot, the negative looks like it had a losing battle with the flywheel – evidenced by a 6″ electrical tape wrap
- new plug wires – I could buy new original style wires and for not much of a premium, but I’m going with 8 mm low resistance marine wires – worthy upgrade
- new distributor cap (more on that later)
- new fuel line (more on that later)
- new belts – (1) alternator belt and (2) water pump belts
- new stuffing box packing and packing hose (more on that later)
Group 2 – (when I get more $) –
- new hoses (motor and bilge pump) – most of them should be straight forward, at least 3 of them will be tough due to their bends
- new ignition coil
- 100% new wiring
I’ve purchased everything I need for the first list – aside from the last item, I need to get into the boat and take some measurements on the prop shaft and packing nuts.
Memorial Weekend would have been a great get-work-done weekend, but we were up north at a wedding for one of Lindsey’s best friends. We had a great time and it was much needed time away from home. We were in Good Hart – north of Petoskey on Lake Michigan.

Lake MI
The battery cables are done –
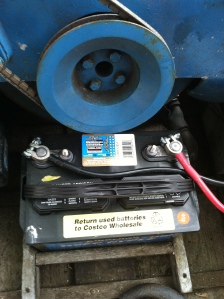
New batter wires (and battery). I will do a proper battery box soon.
The plug wires are on back-order. Frustrating because it’s one of the easiest things to replace and I’ve now been waiting close to three weeks for them to arrive.
The fuel line I am replacing because I want to put in a good in-line fuel filter water separator. Someone previously put a cheap in-line filter but made a serious mistake in the process. The OEM fuel line is copper all the way from the tank to the motor. Durable, but also doubles as a ground for the tank. Static discharge when filling a gas tank is a serious concern, without a ground that’s very dangerous. Whoever spliced in the existing fuel filter cut the copper line and used rubber hose to splice in the filter – eliminating the ground. To fix the grounding issue, we’ve run a 10 gage wire (marine wire) from the tank fill tube to the common ground on the engine block. I will replace the fuel line after we’ve had the boat running and burn through the old gas.
The distributor cap has been a bit of a pain. I first found one on Amazon, for something like $25 – good deal. It arrived and it was brown. I found another that is the original black color, from RockAuto. So I sent the Amazon one back and ordered another and installed it. Done.
This past Sunday, June 2, was first launch day. Glen and I took care of the fuel tank ground, and also repaired the supports for the port side front seat and the support on the starboard side of the rear bench. In fact, we completely disassembled the front seat, cut a new piece of mahogany for the support and reassembled it. All of the seating will need to be rebuilt at some point but for now it is all solid. Previous attempts to fix the supports appeared to be more of the “just put more screws in it” type of effort.
After doing that, I put about 10 gallons of gas in the tank, to dilute the 10 I already had (I made a measuring stick — I’ll do a post on that soon) and we went to the Grosse Pointe Woods park boat launch. Well, she floats…
First Launch
..mostly. The stuffing box and shaft log are leaking, and more than is acceptable. Those unfamiliar with these terms – the shaft log is a bronze fixture that the propeller shaft runs through and it is screwed and sealed to the boat. The stuffing box is what seals the shaft – it contains a rope impregnated with flax or teflon to make the seal. There are drip seals and drip-less seals. The drip seals are the older style – the idea is to allow some water (3-4 drips per minute) through to cool and lubricate the shaft, drip-less are newer and based on what I’ve read it seems like your opportunity to install them incorrectly and cause damage to your shaft is greater. Any way, we’re going to have to reseal the stuffing box, and reseal the shaft log. We’ll have to pull the shaft to do all this – at the same time I’ll examine the cutlass bearing. Look for this in a future post.
I did not notice any other major leaks. Thankfully. However, we were unable to start the boat. We narrowed it down to not getting any spark – recall that I replaced the distributor cap. Our initial thought was the cap wasn’t correct. I towed the boat home, put the old cap back on and it fired right up (I am trying to avoid starting and running the motor dry as much as possible – which is why I didn’t try to start the motor after putting the new cap on it). So inspecting the new cap I discovered the pin/prong or whatever you want to call it at the center at the ignition coil connection was non-existent –
Defective cap/launch ruiner
Lesson learned: inspect your new parts before installing. I got a refund on the part and I’ve ordered a new one.
I am waiting for the new belts to arrive, I’ll go into those on the next post. I have a busy couple of weeks so it probably will not be until the weekend of June 22 that we try to run the boat again – this time possibly in Lexington.